Every project reaches a point in which things start to get hard, trouble arises and you start to worry whether you will make it on time or not. The last five days have been just like that. But despite the setbacks, we have to find new ways to overcome, be creative and use the opportunity for the better. And I think we have done just that. Here is a recap:
Wednesday 20th
Machines (PCs) with Vista are hard to boot in windows XP but that’s nothing compared to trying to get Linux to run on a new machine…. no drivers for new boards.
Wednesday I brought the computer that I bought for the machine into the shop for the software team to get started. I was supposed to give them an XP box and the machine came with Vista. Well, I could not install XP with my DVD copy - I needed a boot copy. After meeting with them we decided simply to wipe the machine and boot it in Linux. They would take care of this. And so they started the process only to find out that Linux still did not support some of the boards on the this brand new machine. We needed an older machine. Hans agreed to lend us one from his lab in the meantime. We will build on that and test while we figure out who should build our own machine out of older parts. Actually I will ask Tim at headquarters to see if he has something laying around. Then there are problems with the control board; even though it says specifically that it supports Linux EMC (that’s a flavor of our CNC Linux), that board is not updating its firmware. The group got on the user group and forum to try and find a fix. Today I should know if they got any where but overall the difficulty of configuring hardware to run with Linux may be something that will seriously discourage users from engaging in building their own machines. I am sure that we can incorporate difficult component design and assembly strategies and people will not complain. After all this is what they do for a living but getting on the Linux board to try and get their specific hardware to run it is other story best left to computer-savvy individuals. Hopefully we can standardize the procedure enough for it not to be a barrier to entry.
Z redesign started again
Ok, our previous design was proving too difficult to align and true. It seamed elegant and efficient on the computer, but after working with the material on the y axis, I realized that it was going to be impossible to true (align faces at 90 decrees to each other). So I decided to stir the design to a more traditional approach. I told the team that many times - you think you are being innovative and as you refine your design you end up looking very similar to what is out there already. This happens for a reason - a 50-year-old machine out there that’s working is in parts because of its good design, tried and tested. So we are back to tried and tested.
It’s Wednesday afternoon and the materials at hand are steel plate and 5” perforated bar. Camilo and I started working with this to come up with a design that can be cut on Thursday in the plasma cutter and welded on Friday. However, that computer running the CNC plasma went down on Thursday morning, we found a bug in the design that we corrected on Friday, delaying the tool path programming. And to make matters worse, around mid night on Friday I found another major bug. I was flying out to Boston on Saturday morning and had no easy way to get in touch with Juan, his home phone number was written on the shop’s white board and I had to be at the airport at 7:30. So once I checked in I woke up Pedro to ask him to try and find Juan and stop the cutting or try to correct the problem. I just got word today that indeed it got stopped. I should call them right now before getting on the flight to Medellin.
Y-axis needs to be redesigned
Remember that long blog entry about using the inserts embedded in concrete? Well that idea was not going to work. Why? Simple - they don’t have enough interference with the concrete. And what determines the interference factor with concrete? The average size of the grains of sand. You need a few of them to fit in-between interference elements. With the inserts I got you could barely fit one grain. So those would not work. Also as we thought more and more about the idea that if we machined custom inserts, which was still a possibility, we still had major leveling and alignment problems. The inserts need to be very perpendicular to the rail, other wise they will induce uneven forces. This was not apparent until we had aligned one side of the beam with inserts. So off came the inserts. We needed a better solution, one that would take care of the threading requirements and the flatness. We decided to weld on a half inch piece of plate on top of the beam. The only problem was that we would need to machine it to make it flat, other than that it would take care of all the problems and make for a very nice surface for mounting and re-mounting as needed.
Now this story has a happy ending, Esteban invited a friend over (I forget his name) and he brought him in because in the past they have worked together and he has proven very valuable with innovative solutions. Esteban explained to him the problem at hand, that we need to plane the surface without using a larger machine and that it had to be easy for users to reproduce. After watching us mix and fill in the structure with concrete, which I will tell you about later, he uttered an incredible idea: Use the existing Y-axis rails mounted not on top but on the side of the structure to mount a grinding tool and with gentle passes level the top surface. Now why does the idea work? Very simple - it is easy to align a rail in parallel to a surface. We had figured this out before, simply bolt the rail on with underside screws, and not tighten it down too hard. Place a laser beam on one of the railheads, project it one wall far away and run the rail back and forth. With two people, one calling out the direction of the laser displacement and a second with a soft hammer tapping the rail up and down, one should with reasonable ease ensure that the rail ends up as aligned as possible with little cost. If one wants to go crazy you can up the power, focus and distance at which the laser is projected. I will quantify this sensitivity of the setup later.
Now we have a rail that moves in the Y- axis that is as flat as needed in the x-y plane. All we need to do next is to figure out the grinding setup. I made a quick run to the a hardware store in Medellin an picked up a small vise with an x-y displacement adjustment. It cost me the equivalent of $70 USD and this weekend at home depot I picked up a 2-1/4 hp Rigid router with a 1/2in collet. The router is good from 10,000-23,000 rpm. With the proper stone we should see sparks fly. It may take some time to run and adjust the router to get a fully flat surface but this will be a very solid flat surface. And the part that I like the most about this technique is that it can be used around the machine, not only on the y but the x and z axis, as well. If this technique is mastered we can be making home made machines with high tolerance ground surfaces for rail ways for peanuts. To make sure this method is accurate I have procured a digital displacement gauge with digital output. It was pricy around $700 USD including all the cables and signal-conditioning box. Since I am pressed for time, computer plotting is essential but someone with fewer resources can accomplish the same with pen and paper and a $150 gage. I will definitely keep you posted on how this goes. Also, the rigid router is special in the sense that it seems you can mount it backward through its base with a simple modification. This will give you a nice mounting structure at the rear of the router.
Coming back to the Z-axis design
It’s Wednesday and we need to finalize the power transmission system. We need a 1:3 ratio to use the full rpm’s of the spindle 9,900 rpm. We know belts are quiet, low maintenance and relatively forgiving. We looked around for V (multiple) belts, and trapezoid (teeth) synchronous belts. After some rough sketcheas we had an idea of what would do the job. Esteban and Lina set off to buy the material for the concrete mix and visit the local belt supplier. They came back with not so good news, the supplier has V belts good for 3600 rpm, and synchronous belts were also good for 3600, were special order and cost the equivalent of $380 US. They had also asked for J-section belts, those are the ones with many small v grooves, the same type you’ll find in cars. They said they are almost impossible to find. This came as a shock to me - all I need to do was to walk to my auto parts store and order a belt for my suburban. I know it can handle the rpm’s because the Chevy small block has like an 8 inch pulley at the crank, and the alternator is about 2.5 inches and it redlines are about 5,000 rpm at the crank. It has plenty of accessory loads and runs for thousands of miles in a high temp environment., while also enduring winters and summers. I had no doubt this J-section belt will do the job. We could even use the same belt tensioner as the small block. Frustrated, I went back home that evening and went online to find this belt and pulley. After surfing through Autozone, I remember looking up the belt while building solar cars at MIT in McMaster-Carr. Indeed they had everything I needed with overnight delivery. I stayed up past 2 a.m., modeling the pulleys and configuration, weighing design options between synchronous and J-section, determining belt lengths, setup cost, pulley rations, motor positioning and coupling specifications. The most expensive setup came out to $320 USD for the J-section with twin 8-groove belts for a total of 16-groves. I couldn’t find an idle pulley for something this wide, so this is still to be designed. We may make it ourselves or we could buy two belt tensioners (for about $100UDS).
Thursday 21st
I came in early on Thursday and got Lina to start integrating the pulley design onto the Z –axis. During lunch Camilo and I continued. In the morning Camilo had also finalized the new pieces for the Y-axis so Juan, Esteban and Yesid got working on those pieces.
We also decided to play with plastic metal and resin from Devon. It was one of our original options for leveling but we had not tried it out. So we set up to do that. We found that it is quite thick and a vacuum would be needed to take out all the bubbles. It also did not level very well. The final finish was hard enough for us and after some hand filing the results where not that bad. I have a 4 lbs can on order in case we do end up using it.
We also got the Ethernet cable wired into the shop space, we were not live but at least the cable was in. Gabriel was key in making this happen. He really got people moving. As of Friday we still did not have our IP address configured but we did put a wireless router in place to get all of our machines connected.
We tried to stay late on Thursday to make sure the plate section for the Y an Z got cut but Juan decided to go home and do it in the morning. I was not very happy with the decision and it was precisely the next morning that while fiddling with the drive partitions of the machine’s controlling PC that he brought the machine down. It wasn’t until a restoration image was loaded that the machine would be operational. However, this delayed that spindle all through Saturday. It ended up being as kind of a blessing in disguise. It wasn’t until midnight on Friday that I discovered another major bug in the design. I went to bed again late worried about the structural soundness of the z-axis structure. It would not be until Saturday that I would analyze this with care.
Friday went by like a blur. However we did fill in with concrete the four vertical columns of the machine. Juan Ignacio and Pedro mastered the art of preparing high strength low shrinkage cement. Yesid made a special funnel out of welded sheet metal and off we went, stuffing and shacking the machine to make the viscous concrete flow. The reason for doing it Friday was that we could leave the machine untouched for the weekend while the concrete would set. It need about 48-72 hours of cure time to avoid internal cracking.
We also spent some time working on the setup to mount and align the Y rails on the side of the machine and figure out a mounting structure for the grinding head. We took apart the head of a magnetic drill. Its nice cast base and Z slide were quite useful. We also shopped around for large level (72in type) and found none. After asking around they would have to be special ordered. I did pick up the vise mentioned earlier. The level would have to come form Home Deport state side. I was coming over on the weekend to pick up parts so it was a good time to do this.
Saturday, started out again early in the morning to catch my 9:30 flight out. Its about 45 minutes to the airport and for international they want you there at least 2 hour early so it all ads up.
I spent the MDE-MIA flight designing a casting to the Z axis. I wanted to compare weight and stiffness. I had something slighty heavier at around 200 lbs initially. Once I got to MIA and realized that because of bad weather the day before in Boston I was not going to make any standby list. I sat down for about 6 hours to await my 9pm flight to Boston. During this time I ran an FEA analysis on my initial casting design. The results were not encouraging although they were much better than welded plate steel. After a few iterations, I was getting a ~0.002inch deflection with a 400lb frontal load. I figure this not bad. It is still a lightweight part and it is not reasonable to expect precision under such load conditions. Anybody trying to get more precision will slow down the machine hence reducing the cutting force. I also let the team know to have enough MDF available to make a mockup of the spindle for casting.
Sunday was a long day, having gotten home at about 1 am, I got up early to unpack and clear out all the boxes that had arrived during the week. It really bugs Diana when our modest apartment has been taken over by boxes. This procedure is not simple. I have to check that the packing list matches the content. I have to unpack and get rid of any excessive packages. I need everything to be unpacked for TSA and especially for Colombian customs. If it seems that things are new and in original packages they could give you a hard time, arguing that you are bringing them in for resale. Then I have to recycle all the packaging and break the boxes down to 2x2 feet squares for the recycling truck to pick up. See, Cambridge has one of the country’s most sophisticated and thorough recycling programs. Some people call us the people’s republic of Cambridge but we don’t care. We are proud of our 6 different recycling classifications and that organic waste gets composted by the building for its own garden. I didn’t quite manage to finish before Diana got up but what upset me the most where the paper cuts. Two deep paper cuts while opening these damned boxes.
O well. Not everything that I ordered had arrived. UPS red had failed me! In fact things that were supposed to arrive on Friday did not, and items I ordered Friday morning with UPS red did arrive. I checked online and some stuff was due on Monday the 25th, the same day I was schedule for a 5:30 am departure to Miami. So I called American to weigh my options. A ticket change was $650 for Tuesday and even then there was still one large order on UPS ground with no due date information because McMasterr-Carr’s website was down. So after pondering my options, which included sending Diana, my brother or her sister with my own miles the following week. It turns out that it was inexpensive enough to come back the next weekend for a day. This was a good option because it allows me to find those belt tensioners and see Diana at least for a day. Plus I need the quiet time on the plane to get things like the project’s budget updated and this blog done.
I also managed to go to Home Depot, buy my levels, and some 4in drain pvc tubing to pack them in for protection. Got the router and some bits and headed home to pack. Packing also is not simple. I have to weigh what I bring. I know I am over weight but I try to keep the extra bags and weight to a minimum. Also I have to be conscious that the TSA guys don’t like what I pack - too many large metallic heavy objects, mysterious epoxies and sharp tools. I can just see them opening and rescanning things. So the packing has to allow for easy inspection, removal and repacking. The PVC worked great this time, and everything fitted very nicely in my ski bag.
Monday, 25th.
I am back on the road again. After working on the plane, I arrived in Medellin and my ski bag did not make it. Anyway I came down straight to the shop to unload. I got the good news that Linux and the PC card were working and that signals where coming out. Next step, a motor screw setup for testing. We stayed late on Monday, we figured out how we wanted to mount the y-axis rail and stayed until the pieces where tacked in place so in the morning Yesid would fully weld them. We made it home by 11:30 just enough time to catch-up with email and a shower.
Tuesday, 26th
First thing, the driver for AA picked me up and took me straight to airport to claim my delayed ski bag. Did I mention that the new rails for the Z axis where in there? Yep - SHS35’s 1000mm long. I think I mentioned this but the DIAN (Colombian customs) requires that you come in person. As I picked my bag I noticed the same DIAN officer I always see and approached her. They know me by now because of my unusual luggage in a relatively small airport. I took the time to explain to her what I was doing and what to do in the future with more industrial like machinery. It was good that I talked to her. Then back at the shop, Yesid was finishing the welding and it was time to re-level the machine. As I took the time to level the base to within 50microns per meter I realized with 4 feet left that it was going to be impossible. So the three-leg design that I had originally designed was needed. Luckily all the pieces were already cut, so Yesid got to assembling them while I carefully scraped off any imperfections form the rail bases. Some final reviews to the Z axis casting and it is off to quoting tomorrow.
Tonight we fix in place the first set of rails (y-axis). Dinner break is over – second shift is just getting started.
Wednesday, February 27, 2008
Thursday, February 21, 2008
Spindle Head
Feb 19th.
Part of my luggage still has not arrived. This was upsetting; the Y travel ball screw is missing as well as a number of pieces that we need to proceed, such as the inserts. After a call to AA in the US, because apparently they don’t give out information to the Colombian agents (upsetting to know) it turns out my luggage had been sitting in Boston for over 12 hours before being sent to MIA. But it did arrive today, the airline arranged for a driver to take me to the airport because we still need to go through customs. Everything arrived just fine but I did loose over 3 hours in the ordeal. Now we don’t have any excuses.
Today was a productive day. We took drastic action with he Z axis. Last night I started to redesign it. Today Camilo quickly took over the CAD modeling, I visited one of our suppliers and found and bought the material for the new spindle housing. I also had a meeting with Andres and Milton. Andres will be helping with programming of EMC that is a flavor of CNC Linux, and Milton will be helping with the electrical parts. Tomorrow we will sit down and start drawing the electrical diagram.
Today I got some very good feed back from people. Jesid, for example, made a good point about the machine needing to be more modular so it could fit through smaller doors. He talked about his uncle and how he would love to have one but it would have to fit trough his doors. Its size might turn some people off.
Esteban suggested nailing down the spindle enclosure before proceeding with the Z redesign. That was a good move.
Next some pictures at last:
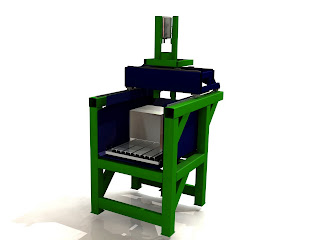
 A rendering of the machine design
 Testing the Y axis fit
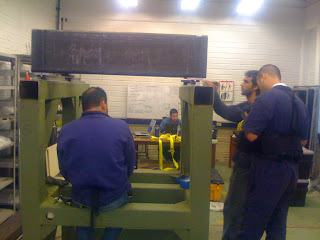 The team examining the setup.
Part of my luggage still has not arrived. This was upsetting; the Y travel ball screw is missing as well as a number of pieces that we need to proceed, such as the inserts. After a call to AA in the US, because apparently they don’t give out information to the Colombian agents (upsetting to know) it turns out my luggage had been sitting in Boston for over 12 hours before being sent to MIA. But it did arrive today, the airline arranged for a driver to take me to the airport because we still need to go through customs. Everything arrived just fine but I did loose over 3 hours in the ordeal. Now we don’t have any excuses.
Today was a productive day. We took drastic action with he Z axis. Last night I started to redesign it. Today Camilo quickly took over the CAD modeling, I visited one of our suppliers and found and bought the material for the new spindle housing. I also had a meeting with Andres and Milton. Andres will be helping with programming of EMC that is a flavor of CNC Linux, and Milton will be helping with the electrical parts. Tomorrow we will sit down and start drawing the electrical diagram.
Today I got some very good feed back from people. Jesid, for example, made a good point about the machine needing to be more modular so it could fit through smaller doors. He talked about his uncle and how he would love to have one but it would have to fit trough his doors. Its size might turn some people off.
Esteban suggested nailing down the spindle enclosure before proceeding with the Z redesign. That was a good move.
Next some pictures at last:
 A rendering of the machine design
 Testing the Y axis fit
 The team examining the setup.
Beam inserts
Feb 18th – Boston – Medellin dreaming up how to thread the beams.
It’s Monday and the day started very early. To catch the 5:30 am flight to Miami that then pulls into Medellin at about 2, I need to be up by 3:30 and leave home by 4. Today I made it to airport by 4:13, a hair before the large early morning international crowd. This weekend was relatively productive. I wanted to get more work stuff done but ended up doing more home stuff, spent time with Diana which was much needed, catch-up with the mail and friends that where visiting town. I am happy that I managed to get almost all the pieces of equipment that I came here to get - ballscrews, spindle and metering tools. I am still waiting for a communication cable to a new displacement gauge and vibration measurement system. I am hoping to get those during my next visit.
The next things on my mind that I will concentrating on this week;
Electrical diagram for the machine.
Sourcing of enclosure components.
Hook up electronics-controller-motors-screws and get stuff to move.
Build the y,x and x axis.
Talking about the axis, I have this idea to place threaded inserts into the concrete. For inserts, I picked extra long brass inserts (the type used in plastics). These inserts have a thread length-to-bolt diameter of over 2, which will guarantee plenty of grabbing length along for the screw also, since we place the insert from the inside. The insert is in compression against the inside wall of the steel beam. I am also considering testing a combination of an epoxy based cement with or with out regular concrete. The idea is to use the epoxy-based cement along the insets and let regular cement fill in the rest of the space. This will accomplish several things - for one it will reduce cost, since the epoxy base cement is a lot more expensive. It also has better strength and damping properties. Also, the combination of these two masses may have a beneficial affect on the structure, reducing the likelihood of resonance. There is also the possibility to further improve the structure by shifting the neutral axis of the concrete with that of the steel beam. This is accomplished by inserting a filling of different density in an asymmetrical location. In this particular case, I am thinking of using a 1 inch diameter piece off wood. It will also reduce the weight of the structure of a bit. Now I am sure you can get fancy with shape, material and location of this insert but we will keep it simple for now. There are other things to take into consideration. I plan to first pre-drill the beam as straight as possible, with a through hole for the screw, then place the insert inside the beam and thread it through with the screw and hold it in place. Once all the inserts are in place but not locked down, I can double-check their alignment with a straight edge. Actually I will not tight them down completely because this action will certainly move them, causing misalignment. Remember we want them as straight as possible so we can later have more place with the entire rail. Since the through hole on the rail is 7mm, the M6 screws give us half a millimeter place on each side. The more scattered the insert the less clearance there will be. Now, and other idea is to hold the screw in place with something like silicone or hot glue - this will certainly hold them in place but will not be permanent.
I would then process to turn the beam with the insert side down and fill in the first layer of epoxy cement, let that set and proceed with regular cement.
It’s Monday and the day started very early. To catch the 5:30 am flight to Miami that then pulls into Medellin at about 2, I need to be up by 3:30 and leave home by 4. Today I made it to airport by 4:13, a hair before the large early morning international crowd. This weekend was relatively productive. I wanted to get more work stuff done but ended up doing more home stuff, spent time with Diana which was much needed, catch-up with the mail and friends that where visiting town. I am happy that I managed to get almost all the pieces of equipment that I came here to get - ballscrews, spindle and metering tools. I am still waiting for a communication cable to a new displacement gauge and vibration measurement system. I am hoping to get those during my next visit.
The next things on my mind that I will concentrating on this week;
Electrical diagram for the machine.
Sourcing of enclosure components.
Hook up electronics-controller-motors-screws and get stuff to move.
Build the y,x and x axis.
Talking about the axis, I have this idea to place threaded inserts into the concrete. For inserts, I picked extra long brass inserts (the type used in plastics). These inserts have a thread length-to-bolt diameter of over 2, which will guarantee plenty of grabbing length along for the screw also, since we place the insert from the inside. The insert is in compression against the inside wall of the steel beam. I am also considering testing a combination of an epoxy based cement with or with out regular concrete. The idea is to use the epoxy-based cement along the insets and let regular cement fill in the rest of the space. This will accomplish several things - for one it will reduce cost, since the epoxy base cement is a lot more expensive. It also has better strength and damping properties. Also, the combination of these two masses may have a beneficial affect on the structure, reducing the likelihood of resonance. There is also the possibility to further improve the structure by shifting the neutral axis of the concrete with that of the steel beam. This is accomplished by inserting a filling of different density in an asymmetrical location. In this particular case, I am thinking of using a 1 inch diameter piece off wood. It will also reduce the weight of the structure of a bit. Now I am sure you can get fancy with shape, material and location of this insert but we will keep it simple for now.
 There are other things to take into consideration. I plan to first pre-drill the beam as straight as possible, with a through hole for the screw, then place the insert inside the beam and thread it through with the screw and hold it in place. Once all the inserts are in place but not locked down, I can double-check their alignment with a straight edge. Actually I will not tight them down completely because this action will certainly move them, causing misalignment. Remember we want them as straight as possible so we can later have more place with the entire rail. Since the through hole on the rail is 7mm, the M6 screws give us half a millimeter place on each side. The more scattered the insert the less clearance there will be. Now, and other idea is to hold the screw in place with something like silicone or hot glue - this will certainly hold them in place but will not be permanent.
I would then process to turn the beam with the insert side down and fill in the first layer of epoxy cement, let that set and proceed with regular cement.
Saturday, February 16, 2008
Thursday 14. Medellin – Miami - Boston
I am back. Yes I did it again, I dropped off. Hey, this isn’t easy building this machine for the first time so quickly - it can drive someone crazy. By the way, don’t leave your cell phone behind in a Colombian airport. It is almost impossible to get back because you can’t leave the terminal boarding area once you are in!! Ok I didn’t try hard enough. My brother managed to convince someone to bring it in for me.
Fabrication has moved along very nicely. This week it seems not much progress happened but it did. We completed the welding on the base, lots of hours went into that. I’d say about 30 hours. We cleaned off and rust proof/primed the base by Wednesday afternoon. Now we have a working surface off which to start referencing all the linear motion components.
We also made some time to dive into castings. Initially I did not want to consider it, but I think it makes sense for smaller parts. We called around and indeed we found plenty of local suppliers that range from 2 to 5 dollar a kg for gray cast iron class 30. Currently we are having the support for the motors cast so that one piece holds the motor and the drive end of the linear screws. We also have a design for a T-slot table, which we will execute if we have time. We have to make the molds, which is not all that difficult. I guess casting will work for people that have access to small casting operations. They can spend a few weekends making the part replica and then take it in for a pour.
Now looking back at this week I feel confident the project will pull through. There is still a ton of work to do but we have the horse power to pull it off. Here is why. I found a great local supplier of motors and electrical components. Their prices are quite good. I just bough a 6.6 hp GE general-purpose motor (made in Colombia) for approx $350 USD with a two year warranty. With the supplier close by I know I can get plenty of support. Then there are the people. The project has a great staff now. Let me start with Jesid, he is our tech. Sometimes he works part-time for the university but for now he is full time with us. He is a funny guy, he has is own quail eggs business. When I asked him how many quails he had he said it’s a small operation but I make a living. He has 6000 quails and pack about a 100 boxes a day. The whole operation takes him a few hours a day so the rest of the time he gets bored out of his mind. His dad used to own a hardware store so he grew up being quite a handy man. Jesid has great work ethic, and he works hard. We don’t have to supervise him and he is always asking for more.
There are the dLaC guys –Estaban, Juan and Pedro. They have taken the roll off leading fabrication. In contrast to their design office in the most trendy square in Medellin, these guys now spend their day in jump suits, working with Jesid and chasing everything that needs to be made. I sit most of the time in the garage with them, working on my laptop and we call on each other for question and ideas. It’s been productive to work this way.
There are Lina and Camilo. I decided to hire help on the CAD side out of concern with the amount of work that preparing the document will take precisely at the time when we are doing the most testing on the machine. Lina started first on Wednesday and she quickly got up to speed with SW2008 and got started on the castings. (This gave me the time to chase down that motor supplier.) Seeing that this was quite a good idea and the fact the Jesid and the dLaC guys where running out of work and the fact that I could not continue to relay on all nighters to design them parts. (Design after a few night of little sleep is not recommend to anyone…not good.) I asked Lina if she new anybody. She said - I know just the right person and he is sort of available. Should I call him? She did and two hours later, Camilo came in. Camilo and Lina have been friends for a while and they graduated this December. Camilo is freelancing partime with the city on science museum project and Lina is waiting to go to France in the Fall to start her masters. Anyways, Camilo took on the enclosures for the machine and in an afternoon he had modeled a significant portion of it. I am so happy to have them helping out!
Then there is Hans Ley, a retired German machine designer that fell in love with Colombia and is now working as a professor. Hans is quite busy with his own stuff but from time to time he throws me a bone. This week he pointed me to a PC base CNC control board that I have been looking for. This was great the holdback in the motion control design so it just leaped forward. Plus he has three students that we are trying to convince to jump on board. They are CS/EE guys. They where initially intimidated because they had to pick the hardware but now that that is done they can focus on getting CNC Linux to run the machine.
And finally there is the staff at the university: Gabriell - CNC machinist; Jorge – Master welder; Juan, who runs the CNC plasma cutter; Jairo, who runs the place; and “The Beast” – he’s like Jesid but I actually don’t know his real name. Everybody calls him “La Fiera.” He is super cool and always willing to lend a hand. They are all very excited about the project and they are doing their part. They all have quirks of their own. For starters, there is Plasma Juan. He is an EE major the prefers to work the CNC plasma machine than graduate. He works part time for the university while he finishes his degree. He is the kind of person that would fit at MIT - he wears his welding hood while he bikes. Most people in a rush to cut something would rather not go through him since he likes to explain in detail what we will need to do. But people like him can teach you a thing or two, plus he is totally into the project and has delivered beautifully cut pieces very quickly. Plus, he can’t wait till we are done and pitch the idea of an Open Source CNC plasma cutter.
Then there is Gabriel. He is the most excited and vociferous. He was the one that pushed for us to do castings and got us some initial quotes. He is also inviting all the local vendors of CNC related stuff to come in case we need something or they can be of some assistance. But what cracks me up about Gabriel is his obsession with the New York Yankees. He’s been begging me to bring him back a jersey from the States. The only problem is that I live in Boston, and I tell him I don’t think they sell Yankees stuff in Boston - it may be against the law or just plain stupid. So I tell him that I will have to order it online and that I will have to charge him for the shipping. He doesn’t like paying for the shipping for parts. I’ll get him the jersey anyway, but will not give it to him until the end. I’ll make him work for it.
Then there is Jorge, the welder. He’s the first Jorge I have ever worked with. Jorge is a perfectionist and initially he wasn’t too happy about our not-so-refined approach to welding. It took some time to convince him that a regular Joe in the countryside with a stick welder should be able to do this. Plus stick welding is ideal for thick gage structural welding and is more forgiving. Sure it doesn’t look as nice as what he can deliver but having Jesid do it is like 5 times cheaper, the university rate for Jorge is relatively high. He is happy now with fact he is only going to get the really important parts. The closer we get to the spindle, the more I am going to need his skills. I tell him, but not far away at the base, which is the first phase of the project. Jorge has his own quirk – he is obsessed with his helmet. Well, he has the only auto-darkening helmet around which the university purchased for ~$500 USD five years ago. He treasures this helmet. It is in remarkable condition – no, seriously. And he doesn’t like when others - especially students - use it. I asked him why and he showed me the scratches they have put on it. It’s a fire red Miller Elite helmet with flame detail. He constantly puts it away and even hides it but they find it anyway. Jorge asked me if I could find out what it costs to get one states side. It was only too simple to Google to find out the his helmet went for ~$350 USD, twice as much as other brands with the same specification. I haven’t told him but when I get back I’ll tell him that for 150 he can get something as good with flames and skulls.
As you can see, they are quite the crowd. I am starting to feel like Santa, who instead of returning to the North Pole returns to Boston. I don’t mind as long as it is not imposing, and although Colombia’s economy is in rapid growth (~7%), hardware is still expensive, especially if it is imported. It is one of the easiest ways for the government to ensure tax revenues. Colombia examines 50% of the containers that enter the county. Everything has a tax code or something like it, and when you compare the selection state side tagged with a 30% off sale at places like Travers - hands down the US is the most affordable place to buy tools and gear. This should say something about our ability to compete in manufacturing but does not seem to correlate. I am sure this topic needs a much larger discussion.
Now back in Miami waiting to connect. I am sending my last orders behind. I left my laptop behind for lina to continue the design and tomorrow she will be visiting a few foundries to show them what we need. Camilo has a new Dell Inspiron loaded with SW2007. It’s super fast and smooth. It makes my hp NW series look slow. Now I want to update my PC - bad news, because a fully loaded hp mobile work station will cost about $2,600 USD.
While I am in Boston, I will focus on the electrical diagrams for the machine to ensure that I have enough time to order everything. I also have to ship the spindle and ballscrews and some other gear. Juan and Esteban will be cutting the x and y axis and drilling the hundred or so holes that support the rails. Now, making these holes with modern machinery should by no problem. The problem is that we are not using any machine that is in working principle bigger or better than what we are building. If we manage to do this, then truly anybody can build this machine. So making the holes will take some time. I have to remind them to take some pictures.
There is one aspect that is starting to worry me, and that is implementation of a tool holder. I am not sure what I will be getting from SKF. Too much to worry about and I have not paid attention to this. Will call them tomorrow to find out.
Now to end this very long post. I have to say that this would’ve not been possible with out the incredible support that I have been getting from everybody my family, specially my brother and everybody in Medellin. I bring this up because I do not have this kind of support network in Boston. Most of my friends have come and gone and some have even moved back to Colombia. So although logistics and ordering would of been a lot easier state side, I feel very encouraged by everybody around me to put in the extra long hours that the project has demanded. Plus, you can beat the climate – it helps when you don’t have to worry about the snow.
I am back. Yes I did it again, I dropped off. Hey, this isn’t easy building this machine for the first time so quickly - it can drive someone crazy. By the way, don’t leave your cell phone behind in a Colombian airport. It is almost impossible to get back because you can’t leave the terminal boarding area once you are in!! Ok I didn’t try hard enough. My brother managed to convince someone to bring it in for me.
Fabrication has moved along very nicely. This week it seems not much progress happened but it did. We completed the welding on the base, lots of hours went into that. I’d say about 30 hours. We cleaned off and rust proof/primed the base by Wednesday afternoon. Now we have a working surface off which to start referencing all the linear motion components.
We also made some time to dive into castings. Initially I did not want to consider it, but I think it makes sense for smaller parts. We called around and indeed we found plenty of local suppliers that range from 2 to 5 dollar a kg for gray cast iron class 30. Currently we are having the support for the motors cast so that one piece holds the motor and the drive end of the linear screws. We also have a design for a T-slot table, which we will execute if we have time. We have to make the molds, which is not all that difficult. I guess casting will work for people that have access to small casting operations. They can spend a few weekends making the part replica and then take it in for a pour.
Now looking back at this week I feel confident the project will pull through. There is still a ton of work to do but we have the horse power to pull it off. Here is why. I found a great local supplier of motors and electrical components. Their prices are quite good. I just bough a 6.6 hp GE general-purpose motor (made in Colombia) for approx $350 USD with a two year warranty. With the supplier close by I know I can get plenty of support. Then there are the people. The project has a great staff now. Let me start with Jesid, he is our tech. Sometimes he works part-time for the university but for now he is full time with us. He is a funny guy, he has is own quail eggs business. When I asked him how many quails he had he said it’s a small operation but I make a living. He has 6000 quails and pack about a 100 boxes a day. The whole operation takes him a few hours a day so the rest of the time he gets bored out of his mind. His dad used to own a hardware store so he grew up being quite a handy man. Jesid has great work ethic, and he works hard. We don’t have to supervise him and he is always asking for more.
There are the dLaC guys –Estaban, Juan and Pedro. They have taken the roll off leading fabrication. In contrast to their design office in the most trendy square in Medellin, these guys now spend their day in jump suits, working with Jesid and chasing everything that needs to be made. I sit most of the time in the garage with them, working on my laptop and we call on each other for question and ideas. It’s been productive to work this way.

There are Lina and Camilo. I decided to hire help on the CAD side out of concern with the amount of work that preparing the document will take precisely at the time when we are doing the most testing on the machine. Lina started first on Wednesday and she quickly got up to speed with SW2008 and got started on the castings. (This gave me the time to chase down that motor supplier.) Seeing that this was quite a good idea and the fact the Jesid and the dLaC guys where running out of work and the fact that I could not continue to relay on all nighters to design them parts. (Design after a few night of little sleep is not recommend to anyone…not good.) I asked Lina if she new anybody. She said - I know just the right person and he is sort of available. Should I call him? She did and two hours later, Camilo came in. Camilo and Lina have been friends for a while and they graduated this December. Camilo is freelancing partime with the city on science museum project and Lina is waiting to go to France in the Fall to start her masters. Anyways, Camilo took on the enclosures for the machine and in an afternoon he had modeled a significant portion of it. I am so happy to have them helping out!
Then there is Hans Ley, a retired German machine designer that fell in love with Colombia and is now working as a professor. Hans is quite busy with his own stuff but from time to time he throws me a bone. This week he pointed me to a PC base CNC control board that I have been looking for. This was great the holdback in the motion control design so it just leaped forward. Plus he has three students that we are trying to convince to jump on board. They are CS/EE guys. They where initially intimidated because they had to pick the hardware but now that that is done they can focus on getting CNC Linux to run the machine.
And finally there is the staff at the university: Gabriell - CNC machinist; Jorge – Master welder; Juan, who runs the CNC plasma cutter; Jairo, who runs the place; and “The Beast” – he’s like Jesid but I actually don’t know his real name. Everybody calls him “La Fiera.” He is super cool and always willing to lend a hand. They are all very excited about the project and they are doing their part. They all have quirks of their own. For starters, there is Plasma Juan. He is an EE major the prefers to work the CNC plasma machine than graduate. He works part time for the university while he finishes his degree. He is the kind of person that would fit at MIT - he wears his welding hood while he bikes. Most people in a rush to cut something would rather not go through him since he likes to explain in detail what we will need to do. But people like him can teach you a thing or two, plus he is totally into the project and has delivered beautifully cut pieces very quickly. Plus, he can’t wait till we are done and pitch the idea of an Open Source CNC plasma cutter.
Then there is Gabriel. He is the most excited and vociferous. He was the one that pushed for us to do castings and got us some initial quotes. He is also inviting all the local vendors of CNC related stuff to come in case we need something or they can be of some assistance. But what cracks me up about Gabriel is his obsession with the New York Yankees. He’s been begging me to bring him back a jersey from the States. The only problem is that I live in Boston, and I tell him I don’t think they sell Yankees stuff in Boston - it may be against the law or just plain stupid. So I tell him that I will have to order it online and that I will have to charge him for the shipping. He doesn’t like paying for the shipping for parts. I’ll get him the jersey anyway, but will not give it to him until the end. I’ll make him work for it.
Then there is Jorge, the welder. He’s the first Jorge I have ever worked with. Jorge is a perfectionist and initially he wasn’t too happy about our not-so-refined approach to welding. It took some time to convince him that a regular Joe in the countryside with a stick welder should be able to do this. Plus stick welding is ideal for thick gage structural welding and is more forgiving. Sure it doesn’t look as nice as what he can deliver but having Jesid do it is like 5 times cheaper, the university rate for Jorge is relatively high. He is happy now with fact he is only going to get the really important parts. The closer we get to the spindle, the more I am going to need his skills. I tell him, but not far away at the base, which is the first phase of the project. Jorge has his own quirk – he is obsessed with his helmet. Well, he has the only auto-darkening helmet around which the university purchased for ~$500 USD five years ago. He treasures this helmet. It is in remarkable condition – no, seriously. And he doesn’t like when others - especially students - use it. I asked him why and he showed me the scratches they have put on it. It’s a fire red Miller Elite helmet with flame detail. He constantly puts it away and even hides it but they find it anyway. Jorge asked me if I could find out what it costs to get one states side. It was only too simple to Google to find out the his helmet went for ~$350 USD, twice as much as other brands with the same specification. I haven’t told him but when I get back I’ll tell him that for 150 he can get something as good with flames and skulls.
As you can see, they are quite the crowd. I am starting to feel like Santa, who instead of returning to the North Pole returns to Boston. I don’t mind as long as it is not imposing, and although Colombia’s economy is in rapid growth (~7%), hardware is still expensive, especially if it is imported. It is one of the easiest ways for the government to ensure tax revenues. Colombia examines 50% of the containers that enter the county. Everything has a tax code or something like it, and when you compare the selection state side tagged with a 30% off sale at places like Travers - hands down the US is the most affordable place to buy tools and gear. This should say something about our ability to compete in manufacturing but does not seem to correlate. I am sure this topic needs a much larger discussion.
Now back in Miami waiting to connect. I am sending my last orders behind. I left my laptop behind for lina to continue the design and tomorrow she will be visiting a few foundries to show them what we need. Camilo has a new Dell Inspiron loaded with SW2007. It’s super fast and smooth. It makes my hp NW series look slow. Now I want to update my PC - bad news, because a fully loaded hp mobile work station will cost about $2,600 USD.
While I am in Boston, I will focus on the electrical diagrams for the machine to ensure that I have enough time to order everything. I also have to ship the spindle and ballscrews and some other gear. Juan and Esteban will be cutting the x and y axis and drilling the hundred or so holes that support the rails. Now, making these holes with modern machinery should by no problem. The problem is that we are not using any machine that is in working principle bigger or better than what we are building. If we manage to do this, then truly anybody can build this machine. So making the holes will take some time. I have to remind them to take some pictures.
There is one aspect that is starting to worry me, and that is implementation of a tool holder. I am not sure what I will be getting from SKF. Too much to worry about and I have not paid attention to this. Will call them tomorrow to find out.
Now to end this very long post. I have to say that this would’ve not been possible with out the incredible support that I have been getting from everybody my family, specially my brother and everybody in Medellin. I bring this up because I do not have this kind of support network in Boston. Most of my friends have come and gone and some have even moved back to Colombia. So although logistics and ordering would of been a lot easier state side, I feel very encouraged by everybody around me to put in the extra long hours that the project has demanded. Plus, you can beat the climate – it helps when you don’t have to worry about the snow.
Saturday 9th
Today was a special day. For the first time in 13 years, I spent my birthday with my parents and family. The day started out well at 8 am. I was in the shop with Jesid and Juan finishing up the weld on the base after all the pieces had been tacked. Once we got done, we thought about flipping the machine over (right side up). See, we welded it upside down over leveling jacks to ensure that the top two faces of the structure which is where the Y-axis rail were as planer as possible. There was a small debate about how to move it. Juan was kind of scared of flipping it over. He was worried that the weight would be to much to bring down with any kind of control. Let use a lever I said, plus it should not be over 400Kg, with the three of us and the machine’s broad stance it should not have been a problem. Well, caution prevailed and we brought over a hand jack/forklift thingy to aid with the job. We left around 1, Jesid was going to come in early on Monday to finish the welds he was not reaching easily before.
The afternoon included a spectacular late lunch prepared by my mom, a cake cutting with relatives in the early evening, and a trip to a night club with my brothers and some of their friends. I have to say I had fun, we talked a ton about fashion and sport baiting suits and danced a bit. I needed to take my mind off CNC machines for the evening.
Wednesday, February 6, 2008
Finding Componets
Tuesday 5th
Ok, I was away for a while but it was for a reason. I spent most of last week finding and ordering components. I flew back to the U.S. on Thursday, spent more time ordering, on Monday searching locally and driving around, and yesterday I spent most of the day packing. Today I traveled back to Colombia and brought a ton of gear – literately.
But most importantly, I got somewhere with the design. For starters it got trimmed down in weight by 50%. We’ve designed a clever concrete filling system. (See the pictures below.) The mix is regular concrete with medium sand and a bit of plasticizer to reduce the water content and reduce shrinkage while also improving concrete flow.
We will be cutting open one of the beams tomorrow. I’ll post pictures of that. And we decided on adding shear damping to the exterior of the frame members
I also feel quite happy with the screw/motor setup. Thanks to SureServo’s free tool we quickly modeled the system and matched the motor torque to system inertias and loads. If all goes well, it should work.
Wednesday 6th
Today all the pieces arrived in Colombia without a problem. I got a quick overview of what happened in my absence of which the noticeable things are the beam filling and the modules for the machining bed. After some straightness issues that got resolved I am pretty happy with the result. Keep in mind that this is a very cost effective design, for about $300 US. I also found out about two places that locally do castings. I hope to visit them tomorrow and find out more.
We also found a suitable 7.5hp spindle motors (a Baldor M3770T) for about $650 USD, which is below MRSP states side (about $960 USD). I could of gotten something cheaper form AutomationDirect for around $500 USD but it would of cost $300 USD to bring it over, plus the import hassle.
A spindle from SKF has also been ordered. I should get it in about a week. It was the single most expensive piece at around $5,000 UDS. It’s a 4000 Series triple ceramic bearing on the nose, 9,900 rpm and over 700 lbs of thrust load. It will be a nice spindle to test with. I am sure we could get the cost of this spindle down under 2k once we source it without the time pressure.
Subscribe to:
Posts (Atom)